Complete Guide to DIY Steps
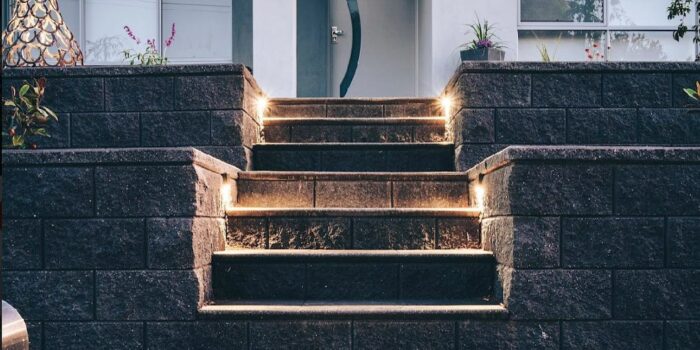
Completing your own DIY projects is not only substantially cheaper but also rewarding and DIY retaining walls and steps can be easier to do than you think. At APC, we help support you by talking through your project, helping select the best product for your job and provide you with the resources to do the job yourself.
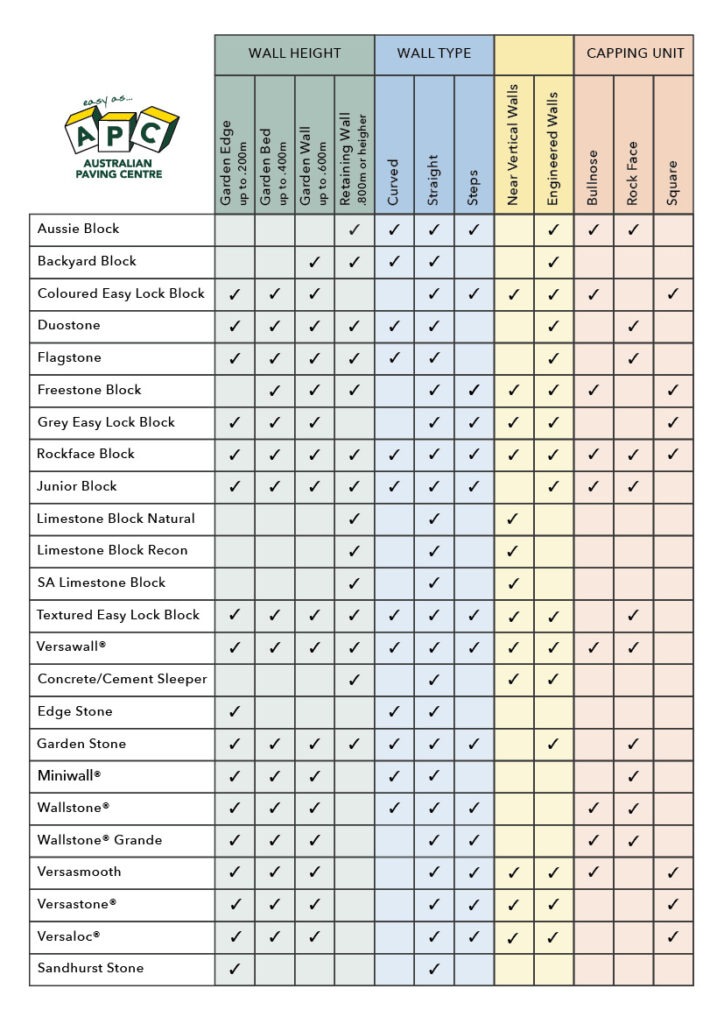
Our retaining wall blocks include DIY friendly blocks that are designed with features such as a hollow core and interlocking lugs, making the installation process simple. Our complete guide to DIY Steps will provide you with step-by-step instructions for –
• Prepare the base leveling pad
• Lay the first, second, and third courses
• Fill the cores with concrete or gravel
• Add step treads
• Create risers
• and more
This guide can help anyone create beautiful and practical stairs for any wall systems.
To help get you started, we recommend to check out our Complete Guide to DIY Retaining Walls guide.
required tools and materials
- Ear muffs
- Eye protection
- Gloves
- Measuring tape
- Road base (allow up to 150mm deep)
- 10-20mm blue metal or screenings for block infill (if req) and backfill
- Spirit level
- 3mm metal straps or plates (for levels)
- Screeding bar
- Rubber mallet
- Wheelbarrow
- Spade / shovel
- String line (optional but recommended)
- Pegs or stakes
- Broom
- Marker spray paint
- Brush
- Compactor
- Brick saw
- Hammer and bolster (splitting blocks)
- Drainage pipe
- Sand
- Caulking gun
- Construction grade adhesive or tiling glue (for applying capping units)
- Walling product

Step 1 : Prepare the site
Correct preparation is the most important part of your project and if done correctly will save you time in the long run and ensure your wall will look great for years to come.
We recommend poisoning the grass/area two weeks prior to excavating as this will help you to prepare the area a little easier. Make sure you invest time in preparing a good foundation and be patient. It should be level and an even depth – if you start level, you should finish level! Correct preparation is key to ensure your wall is built correctly and evenly.
Excavation
Mark out the area on the ground where your wall is going to be with your marker spray paint. Dig out the marked areas to the required depth for your foundation plus half a block height, ensuring you remove any roots, debris and soft earth then compact the base of the trench.
Remember, before you undertake any job that requires excavation, you should check with ‘Dial before you Dig’ (www.1100.com.au) to avoid the risk or hitting storm water pipes, electrical lines or data cables.
The depth of your excavation should be 75mm to 250mm dependant upon ultimate height of block wall.
Once you have worked out the desired finished surface level :
- Drive stakes into the ground on the corners of the area to be prepare and run string lines between them at the finished surface level.
- Level the strings using a string line level.
- Mark out the area to be excavated with spray paint.
- Remove all grass from the area to be prepared.
- Excavate the ground to the required depth.
- Check evenness and depth of base by measuring from string line. The finished surface level of footing should be ½ a block depth below ground level.
Step 2 : Sub-grade
Correct base preparation is the most important part of every Retaining wall Project. The sub-grade is the natural soil that the foundation is supported on. This should be firm and all top soil and vegetation removed. Sub-grade should be trimmed to within 25mm of the desired level and compacted if necessary. Backfill for service trenches should be compacted in layers no greater than 150mm. Correct preparation of sub-grade reduces the incidence of shrinking and rutting. Trench should be clear of soft spots ponding water, trenches should be dewatered and cleaned prior to construction of foundation.
Step 3 : Screeding the road base foundation
Roadbase
Compacted Roadbase footing – this is most often used for standing gravity retaining walls where a roadbase is compacted and levelled. A sand leveling pad may be required to get precise level. All materials to be well compacted with a plate compactor.
Concrete Levelling pad footing – this is used when soil conditions are poor or when exceeding the maximum unreinforced wall heights and a concrete base is used with a construction grade adhesive applied to the first course of blocks.
Leveling pad
The leveling pad is to lay bedding sand evenly over the roadbase area to a maximum depth of 10-15mm. Bedding sand (washed concrete sand) is required to refine the finished level to lay the retaining wall blocks on.
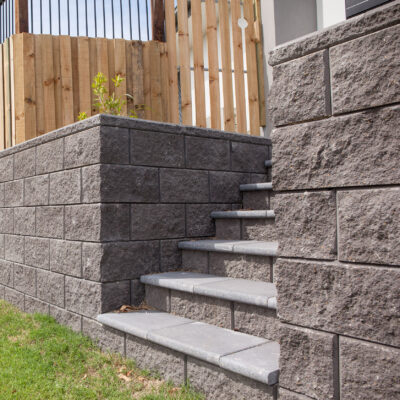
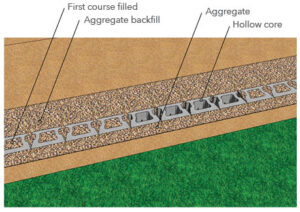
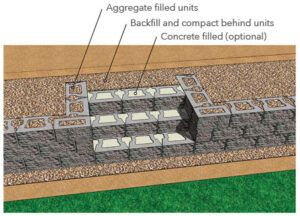
LAY THE First course
When laying your first course, remove the lugs before placing on the leveling pad.
This first course of the step units may be partially buried or alternatively you can lay the first blocks on to the compacted road base and levelling pad at ground level.
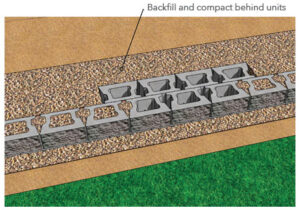
Backfill behind the first course with gravel, compact so that it’s level and flush with the top of the first course.
Do not fill the step units’ cores with gravel if you plan to use concrete.
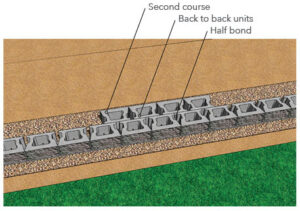
LAY THE NEXT course
Place the next row of units behind the first course and lay them back-to-back on a half bond.
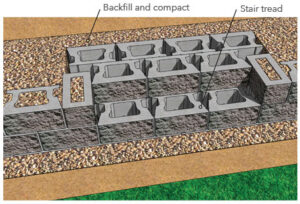
Backfill behind each course of step units with gravel or road base, compact so it’s level and flush with the top of each course.
Do not fill the step units’ hollow cores with gravel if you plan to use concrete.

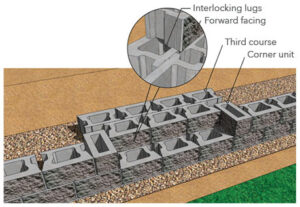
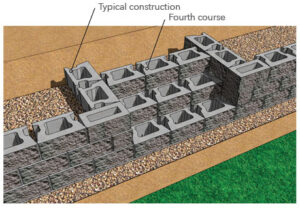
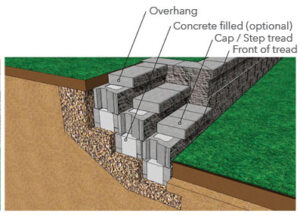
LAY THE NEXT course
If more courses are required, repeat the process of placing each course of step units back-to-back behind the next course of units on a half bond.
The top and final step tread block is placed with the split face facing forwards like the diagram below.
If you are looking for greater stair stability, fill the cores of all the step units with concrete.
Flush the concrete/gravel core infill to the top of the units.
Use a steel bar to hand-vibrate the cores to insure proper filling.
Option: Unit cores can be filled with gravel but must be well compacted.
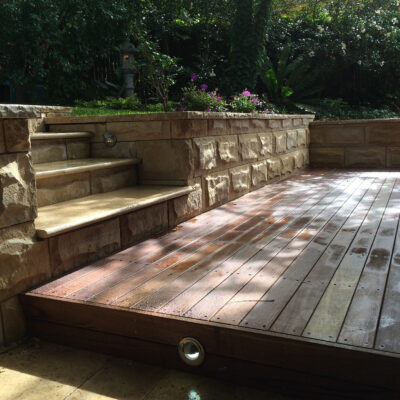
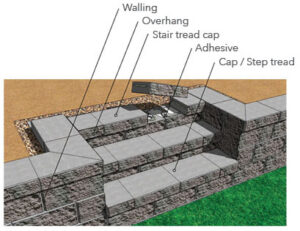
STEP TREADS
Split face or bullnose cap units can be used as a step tread.
Option: Pavers, Patio Slabs, or Natural Stone can also be used as a step tread.
RISER CROSS SECTION
The cap will overhang the step units by approximately 30 mm on each step.
Use a concrete adhesive to properly secure the capping units.
Make sure all units are free of dirt and stones before installing.
Place a bead of adhesive between each joint of the caps.
Top 10 tips for easy Delivery
Delivery of your pavers, bricks or retaining wall system is the first exciting step in the construction of your project. We at APC take pride in efficient and effective delivery of our products to your site. A few simple guidelines will help us help you in placing your product where you want it, when you want it.
1. Estimate accurately. We can help you estimate you requirements to avoid over or under ordering.
2. Not so fast! Have your product delivered to site at least one day before starting work. Starting work on the delivery day may lead to lost time due to waiting.
3. Take as much product as you can on each delivery. Ordering a full load ensures priority delivery and allows tradesmen to blend from multiple pallets ensuring an even mix of colours in blended products.
4. Trucks are big! We need to know if there are any obstacles for the trucks such as clearways, main roads, one way streets, schools, hospitals, weight restrictions, a land mark if on a main road etc.
5. Is your site prominent? Place a “site sign” on your front fence or boundary to eliminate any confusion.
6. Is the site locked? We need to know access times. If you require us to enter through a neighbor’s property, it is your responsibility to gain prior written permission.
7. Where do you want them? Consult with your Tradie on best place for delivery and inform our sales staff where your delivery is to be placed. You want your delivery to be in a convenient location, without being in the way. Place markers where possible. Our tractors need at least 2.5 meters clear width and 2.1 meters height clearance.
8. A forklift with a pallet weighs about 5 tonnes. It is your responsibility to ensure the ground and any path or driveway that has to be crossed can take the weight. Storm water pipes are particularly vulnerable to damage.
9. Safety first! Ensure children and pets are well out of the way during delivery. Our delivery drivers will do their best to place pallets in the locations required but they have the final say when it comes to safety and possible site damage and damage to their vehicles.
10. Delivery times. A minimum of 48 hours is usually required to organise your deliveries. We cannot guarantee exact delivery times, as heavy vehicles can be affected by traffic and difficult sites.
Tips on how to find the right tradie
When it comes to paving or retaining walls, you’ll need to consider whether you’ll hire a professional contractor or DIY. You can hire a licensed contractor and they can do the job for you, guaranteeing quality of work. At Australian Paving Centre, we can put you in touch with local paving and landscaping contractors. You can request a quote online and we’ll put you in touch with the right Tradie for your project.
Our preferred tradies operate independently of APC. We do our best to match a local tradie to your project, however you must conduct your own due diligence on these businesses. Please ensure they are currently licensed and insured for the work they are undertaking.
Find someone local. Local tradies should respond to quotes quickly because they are concentrating on work in their local area. If they are local, they are generally on-site more often and readily available to attend to the project for any rectification work or additional small jobs. If you don’t use a local tradie in the first instance, it is most difficult to get the same tradie back to do a small fiddly job.
Your local tradie must be licensed for the work they are quoting to complete. Their builders’ license will have a summary of what work they are authorised to do.
Your tradie must be insured in case something goes wrong on the job. Accidents can happen!
The tradie should provide a written quote. It is not unreasonable for them to ask for a deposit prior to starting the job. A deposit of between 33% and 50% is fair for the small operators.
Ask to see some local work similar to what you are asking them to quote and inspect it.
Look for the local tradies’ Facebook page or Instagram page and check out their work. Some have websites, but most are very basic. If they don’t have a website, this should not deter your choice because a lot of these tradies do not have a website. Good tradies find their work through word-of-mouth and referrals. The tradies having to rely on service-based internet companies for quotes may not produce good quality work.
Try not to use a business where the person quoting the project does not work in the industry in a hands-on capacity. Many people find that those that only quote the jobs and do not get involved in installation invariably over promise and under deliver. These types of business structures are more expensive due to higher operating costs of covering the salesperson or the quoter as well as the installation team.
For best results and better value for money, use the small business owner-operators who quote and build the project they have quoted for you. When the Tradie who quotes the job builds the job, you get a much better result of what you are looking to achieve.
Research and purchase the pavers, retaining wall and landscaping products yourself. It provides a cheaper overall cost for your paving, landscaping or retaining wall project and you buy the product you like and not the product the Tradie makes the most money out of.
Key tips to prepare for your project
1. Some walls over 800mm in height MUST be designed by a qualified and experienced civil or structural engineer with a comprehensive working knowledge of soil mechanics and structural analysis and design. It may be a Council requirement to have the wall certified and supervised by a civil or structural engineer.
2. DIAL BEFORE YOU DIG Before undertaking any project that requires excavation, it’s imperative you call Dial Before You Dig on 1100 or visit www.1100.com.au. Digging into the ground runs risk of hitting electrical lines, data cables or storm water pipes so take advantage of this free service that can supply you with details of where the services run on your property.
3. POISON THE GRASS This tip will save your back big time, don’t worry, you can thank us later. We recommend poisoning the grass in the area you will be excavating two weeks before you excavate.
4. PREPARING FOR YOUR DELIVERY If you’ve ordered your APC products for delivery, please consider access to the property. If you can, please prepare a safe and wide areas for the forklift to drive through. Forklifts require a clearance of 2.8 metres wide and may have height restrictions.
5. SAFETY TIPS Always wear eye and ear protection when cutting blocks or using a compactor. Bend your knees when lifting heavy blocks. Wear work boots to protect your feet and gloves to protect your hands. Slip, slop, slap if you are working in the sun. Building your own retaining wall takes time so also ensure you drink plenty of water to keep hydrated.
6. Start at the lowest point or start from the corners and work out from there. Make sure all walls are locked in and pushed forward. Then compact fill before applying capping units.
7. There is no such thing as too much drainage!
8. Never cut corner units, only blocks when needed,
9. Use short screed bars in your trench. This will make it easier and quicker to prepare the base course.
10. Ensure you order everything you need at once and set aside an allowance for breakages and cutting.
11. Wherever possible keep walls under 1 metre high – better to terrace a 2 metre embankment with 2 x 1 metre walls than build 1 x 2 metre high wall.
12. Seal your retaining wall with a sealer. This can simply be applied with a roller or sprayed on depending on what type of sealer you are using and what type of walling blocks. If sealing your wall, we recommend you do this as soon as possible after you’ve installed your wall before it gets too dirty.
13. In some instances, efflorescence may appear with some concrete products which is a natural occurrence and looks like a white ‘chalky’ marking on the surface. These markings can disappear on their own over time but if you’re wanting to get rid of it quickly, you can get some ‘Anti Eff’ which contains strong acids to remove it but be sure to read and follow the instructions carefully.
14. If you decide not to ‘Do it Yourself’, APC recommends to always use a licensed builder and to sight their current license to ensure they are licensed to carry out the work quoted and subsequently installed. All work must be carried out to Australian standards.
View our extensive range of retaining wall blocks here
Request a Quote today!
Send us a product enquiry or request a quote online